A while back I worked out a drop in RAM replacement on the Midway Y-Unit Arcade hardware.
Twistedsymphony's Projects
A while back I worked out a drop in RAM replacement on the Midway Y-Unit Arcade hardware.
I’ve been looking to add more Konami PCBs to my collection it’s one of the few areas I’m lacking and a few weeks ago I saw a Super Contra for sale on eBay, the board looked dirty but ok, and there were pictures of the game running. I didn’t really pay close enough attention and I think I was distracted at the buy it now or best offer price about $100 below what I normally see them listed at. I made an offer for another $25 lower and it was accepted.

Only later did I realize that the ad was tagged as having “Graphics issues”.
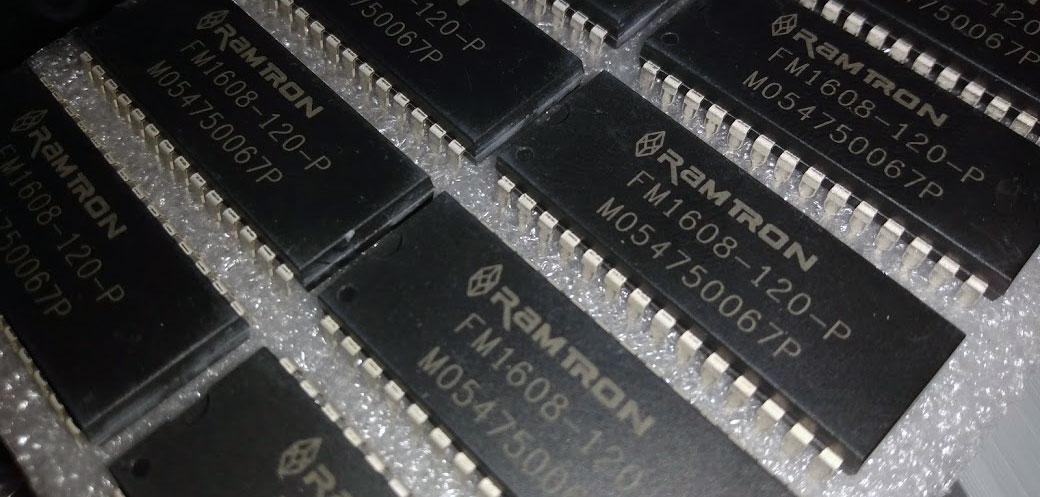
I recently picked up 2 “non-working” Konami M2 boards. I’ve since managed to get both of them working. This hardware is actually fairly robust and it took minimal effort to get mine working but a long the way I learned a lot about how the hardware works and some common problems you might run into.
What is ROMIDENT and why should you care?
When troubleshooting an an arcade PCB it can sometimes be helpful to compare the ROM data on your PCB to the ROM data within MAME. MAME is more than just a way to play classic games, the documentation within the source code is invaluable to understanding how the hardware works, and the ROMs themselves can serve as a tool to compare and verify the ROMs on your original arcade hardware.
To this end MAME has a great feature called “romident”. You’ll first need to use a EPROM reader/writer to read the data off of you EPROM or mask ROM and save it to a file, then you can check to see if that file exists in MAME by running this command: Continue reading ‘ROMIDENT Drag and Drop Tool’
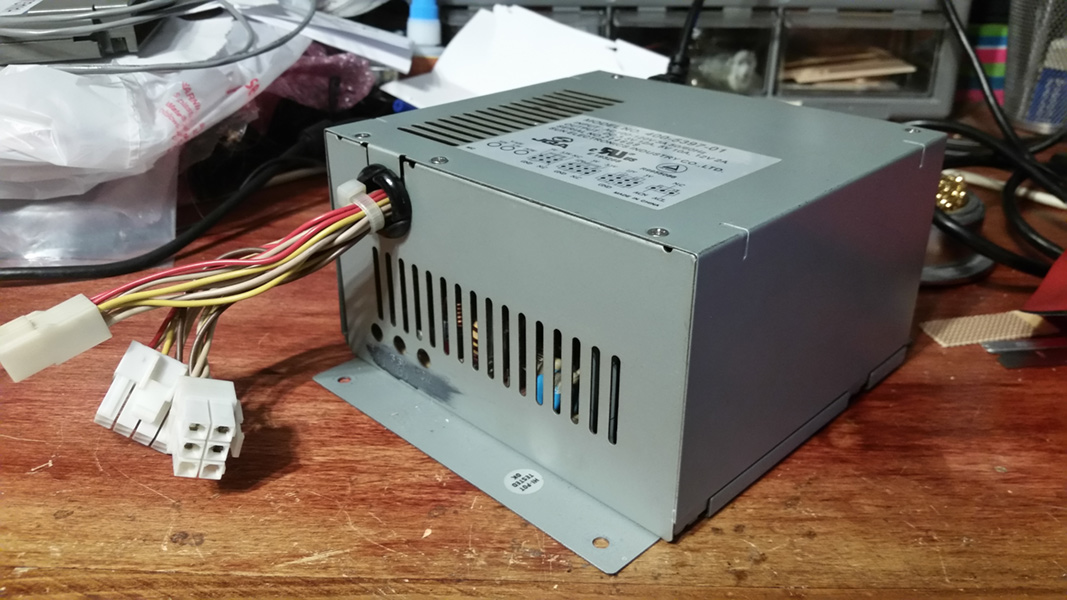
The Sun brand JVS power supply units also known as “NAOMI” PSUs due them being most widely used on that platform have become quite expensive in recent years, even worse is that due to their age many are starting to fail. What most people don’t realize is that similar to CRT monitors, power supplies usually fail due to aging capacitors and many can be revived with a simple cap-kit.
Why not just buy a different PSU?
Normal Arcade power supplies only supply 5V and 12V outputs where as the JVS power supply standard requires 3.3V output as well, also there is a specific connector (JST VL) used for JVS power connections where as normal arcade supplies use either screw terminals or Molex connectors. Even if they did support 3.3V output, the output amperage specs for JVS are also higher than what most 15Watt arcade PSUs can provide, some JVS boards have power consumption requirements low enough that this would be ok but others do not.
There are some people who make ATX to JVS PSU adapters allowing you to use a standard desktop PC power supply for JVS arcade boards however PC power supplies are not adjustable and depending on the specific board you’re using and how your specific ATX supply is tuned it may be providing voltages too high or too low to function properly with a JVS arcade board.
Why Replace the Caps?
Over time the chemicals in electrolytic capacitors break down and expand causing them to not work as well as they should which can cause instability and noise in the power output, in worst cases the capacitor housing can crack and start leaking which can cause corrosion of metal parts and erosion to the PCB. I’ve seen these Sun PSUs sell for $80-$100 in used condition on eBay, many of these are even in need of a cap kit. The very few shops that sell new JVS PSUs charge upward of $300. Meanwhile a cap kit can be purchased for about $8 and with about an hours work can make a dead or unreliable Sun PSU function like new again.
Not to mention spending some time and a little bit of money to repair instead of replace something is much better for your wallet, the environment, improving your skills, and preserving the authenticity of your arcade equipment. It’s win-win from all aspects.
The Cap List
This electrolytic cap list is for the Sun 400-5397-01 model number (the 400-5443 may or may not need the same caps, I didn’t have one available to check). The filter cap is generally very expensive compared to the rest of the list and generally only replaced on an as-needed basis.
C5 – 680uF 200V *Filter Cap
C9 – 47uF 50V
C14 – 22uF 50V
C15 – 10uF 50V
C17 – 1uF 50V
C18 – 2.2uF 50V
C19 – 4.7uF 50V
C21 – 1000uF 10V
C23 – 220uF 25VC24 – 3.3uF 50V
C25 – 330uF 16V
C28 – 2200uF 10V
C29 – 2200uF 10V
C31 – 2200uF 10V
C32 – 2200uF 10V
C34 – 4.7uF 50V
C35 – 2200uF 10V *A small diameter cap is preferred here
C36 – 2.2uF 50V
C37 – 0.47uF 50V
C38 – 3.3uF 50V
C41 – 10uF 50V
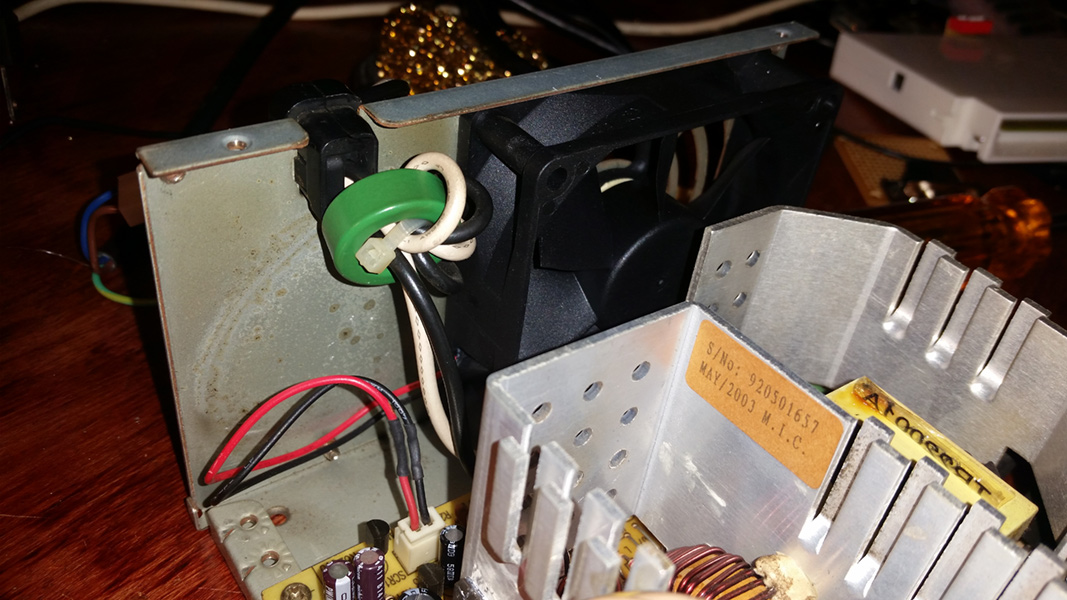
Cap Location Map
Here is a map I’ve put together of where each of these caps is located on the PCB and the direction each cap should be facing. When replacing the caps you should take note of the capacitance, voltage and orientation of the old cap to ensure that it agrees with the above cap list and the below cap map. The PCB itself should also note the capacitor number and orientation of each of these caps for further confirmation. I’ve run into other PCBs where the markings on the board didn’t agree with the direction that the old cap was installed, but in my experience the Sun PSUs have always been marked correctly on the PCB.
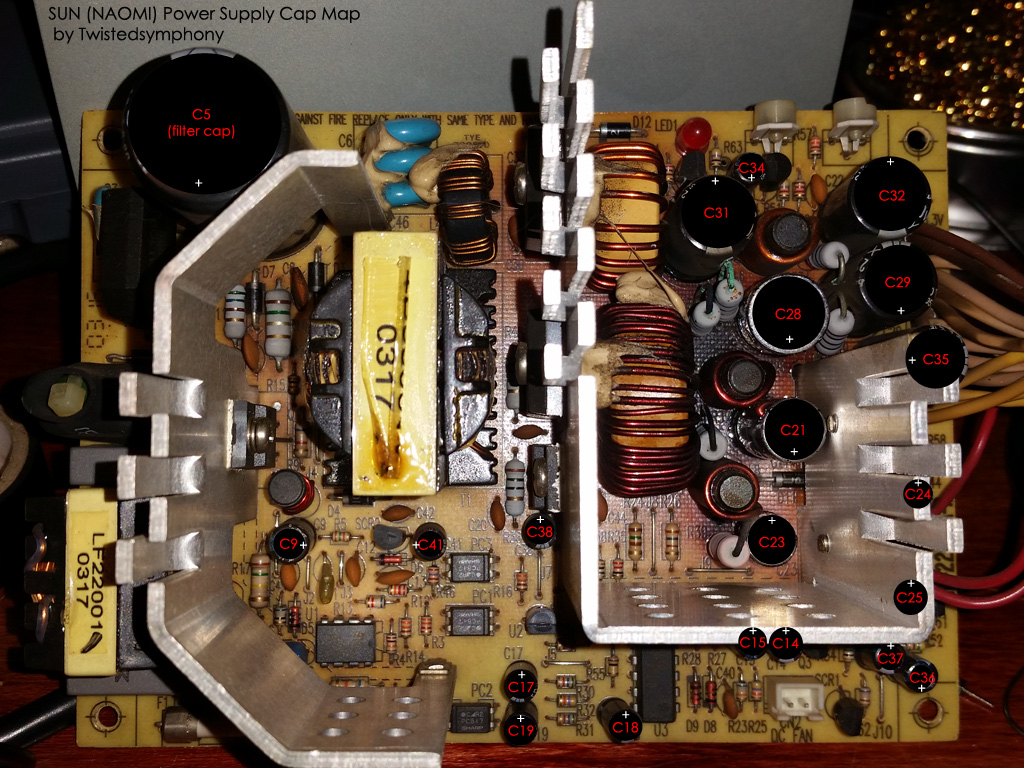
*The cap map was made from a photo I took of one of the PSUs I performed a cap kit on. take note of the blackened PCB by C28, this cap had already cracked and started leaking on the bottom which also caused the green/black corrosion on the neighboring resistors. Thankfully no permanent damage was done. I should also note that from the outside this PSU was running with zero problems. This was a ticking time bomb and I was lucky enough to notice the bloated and leaking cap before the PSU failed and or more serious damage occurred.
Replacing the Fan
These Sun PSUs also have an fan that can die or become very noisy. its the same size and shape as an 80mm (x25mm) desktop PC case fan. This is a 2-pin 12V fan that uses a 2-pin JST PH connector. Most PC fans wont use this connector but you can either cut off the connector of the new fan and splice on a pig-tail from the old one, or buy a JST PH connector to crimp onto the leads of your new fan. Either way replacing this fan is another cheap way to keep your power supply running in top shape for a good many years to come.
Where to buy these parts?
You can piece together your own cap kit using parts from Mouser, Digikey or your preferred online parts vendor, most of these stores will also carry the JST-PH connector for the fan as well. 80mm cooling fans can be found anywhere computer parts are sold.
If you’re interested in buying a pre-made cap-kit instead of piecing one together yourself Ian Kellogg sells one and he also sells the filter cap. I don’t know of anyone else making kits for these PSUs at the moment but if you know of any please leave a comment.
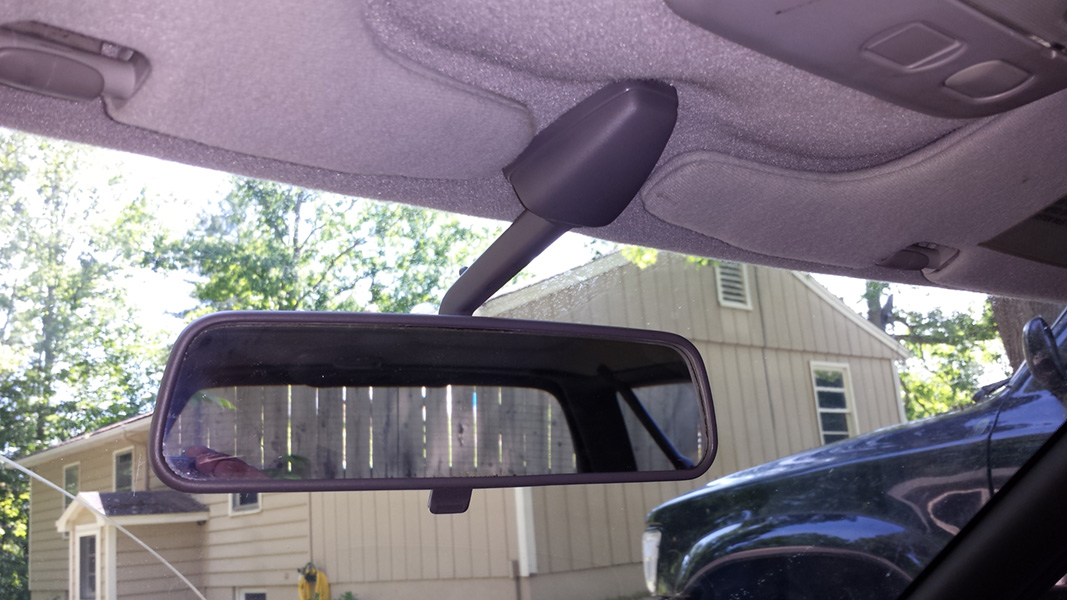
I have a 99 Subaru Legacy wagon with a pretty common problem. The rear-view mirror in these cars likes to droop, it adjusts itself downward whenever you go over bumps. It’s a problem that seems to effect all of 2nd generation legacys (1995-1999 aka the BD or BG chassis). It’s mostly due to the design of the mirror, the ball joint is on the back of the mirror rather than the top, which means in order for it to hold it’s position there needs to be a lot of tension in the joint in order to resist the force generated by the weight of the mirror whenever the car hits a bump.
Having owned several 240SXs I noticed that the S14 chassis (1995-1998) uses a very similar size and shape mirror as the 2nd gen Legacy:

As you can see they both use a similar length arm with a similar shaped mirror and a similar 3-bolt mounting flange. The Legacy mirror is black but the gray color of the 240SX mirror doesn’t matter because it actually matches the gray headliner in the legacy.
What’s not the same about the mirrors the adjustment join:

As you can see the 240SX mirror has the adjustment joint on the top of the mirror which means that any bumps or vibrations will have little effect on the adjustment. Having owned 3 separate S14s I never had any problems with the mirror falling out of adjustment, nor have I ever heard of it being a problem with other owners.
AMAZINGLY the bolt holes on the mounting flange line up perfectly in the Subaru for a 100% bolt on replacement. I used the plastic cover from the S14 mirror since the mounting flanges are shaped slightly different but it looks right at home in the Subaru, and no more droopy mirror.
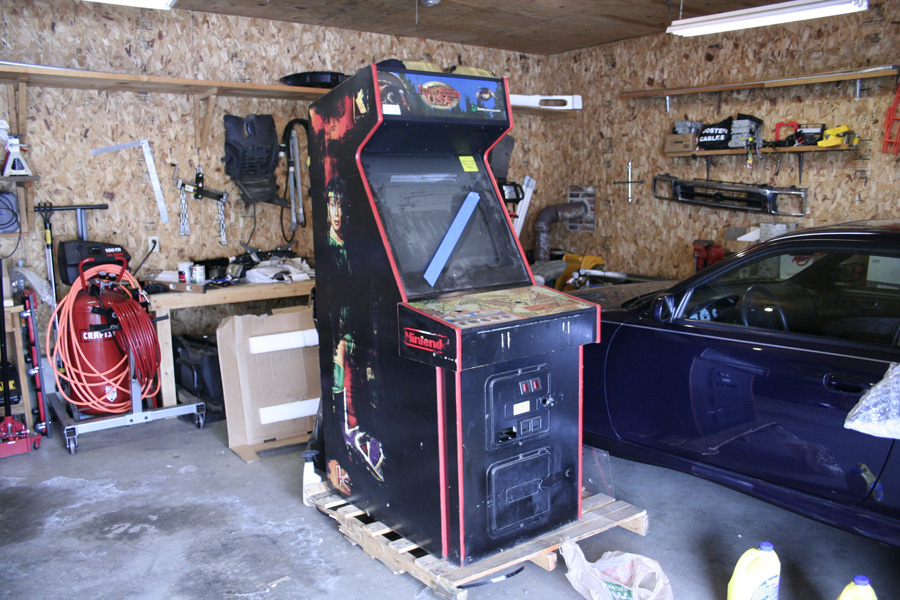
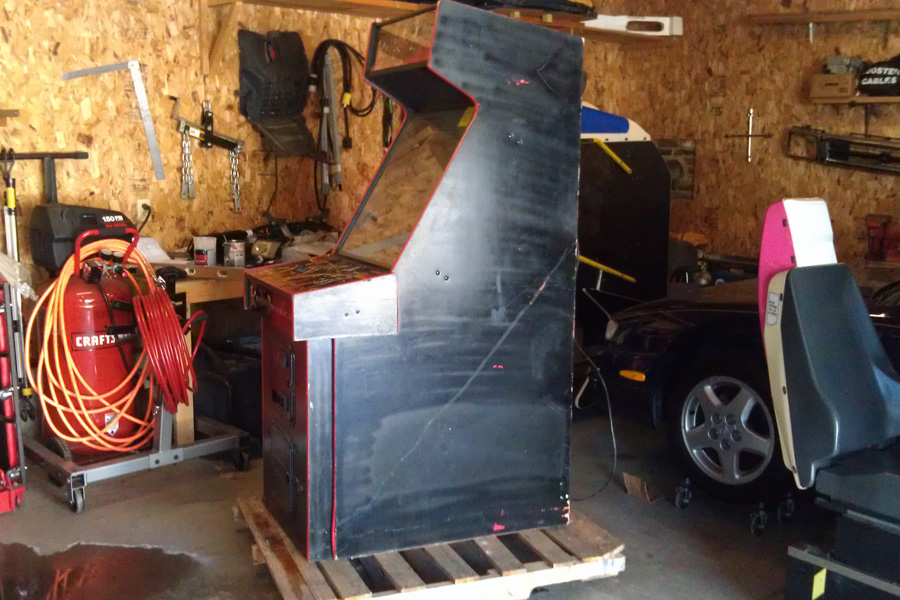
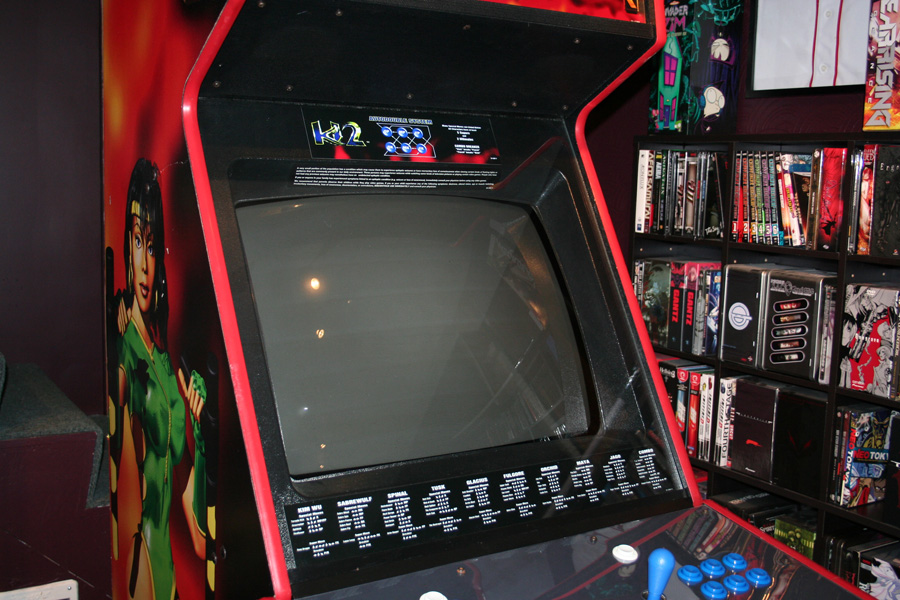
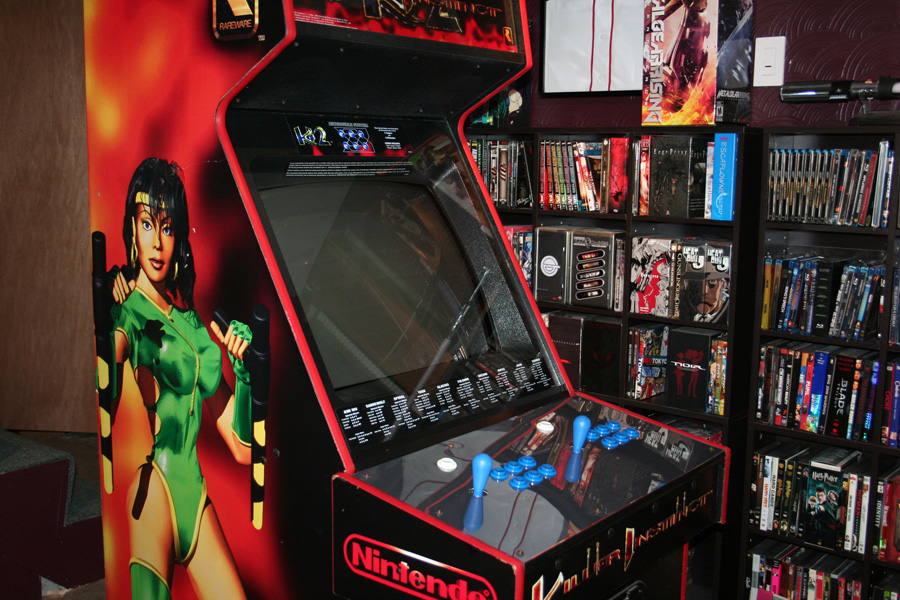
Last month I cam across an eBay auction for a former Killer Instinct 2 arcade machine. I say “former” because this poor machine was converted to “Turkey Hunter USA”. A conversion generally means spray-painting all of the original cabinet artwork black, replacing the computer board and the marque and finally gutting the old control panel, covering over the original control panel art with new art and drilling fresh holes for the new controls. It’s quite sad to see, and it’s something I hated doing when I worked in an arcade.
Killer Instinct 2 is my all-time favorite arcade game, they’re pretty uncommon to find in arcades these days and they’re fairly uncommon among collectors as well and growing in value. The cabinet for sale had the turkey hunter controls and PCB removed so it was just a cabinet and monitor with Turkey hunter art work. $200 +another $150 or so for freight shipping. I decided to buy it and this is what I got:
I had a lot of parts to order, I had to buy buttons and joy sticks, a Killer Instinct Marquee, new control panel lexan overlay and art, and the condition of the monitor and power supply were completely unknown and of course I had to buy a Killer Instinct 2 PCB, without that it’s just a fancy box. Lots of other little things such hardware, wiring, connectors, etc.
Paint Removal/Cabinet:
First thing was getting the paint removed off the original artwork, this was first because I wanted to get it done out in the garage before moving the machine indoors. I first tried a product called Lift-Off, which worked but not very well, I then switched to a different product called Citri-Strip, which was fantastic. The results:

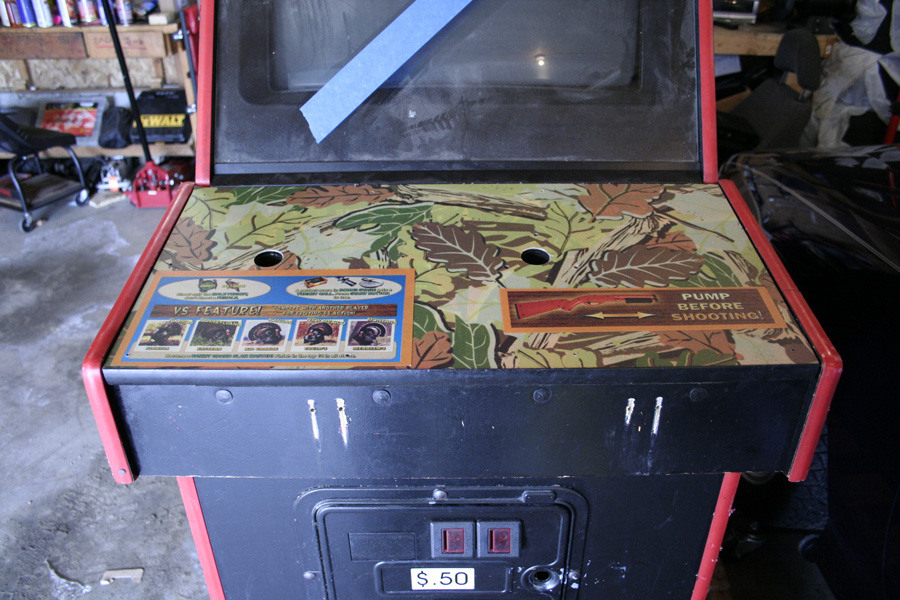
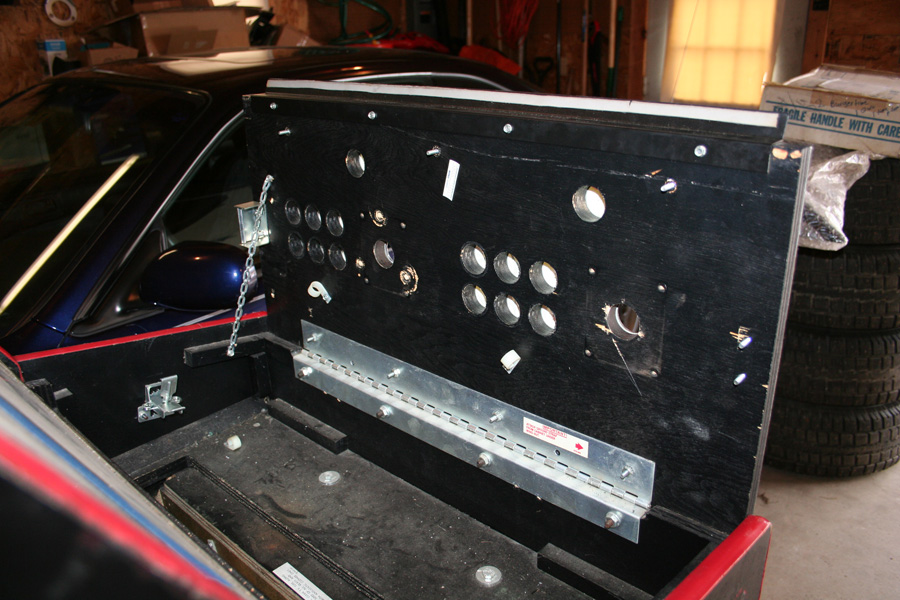
I also attempted to remove the Turkey hunter control panel graphics, after unbolting the plastic overlay I tried both a heat gun and goo-gone to separate the new control panel art from the original control panel art, the results, sadly, weren’t that great:
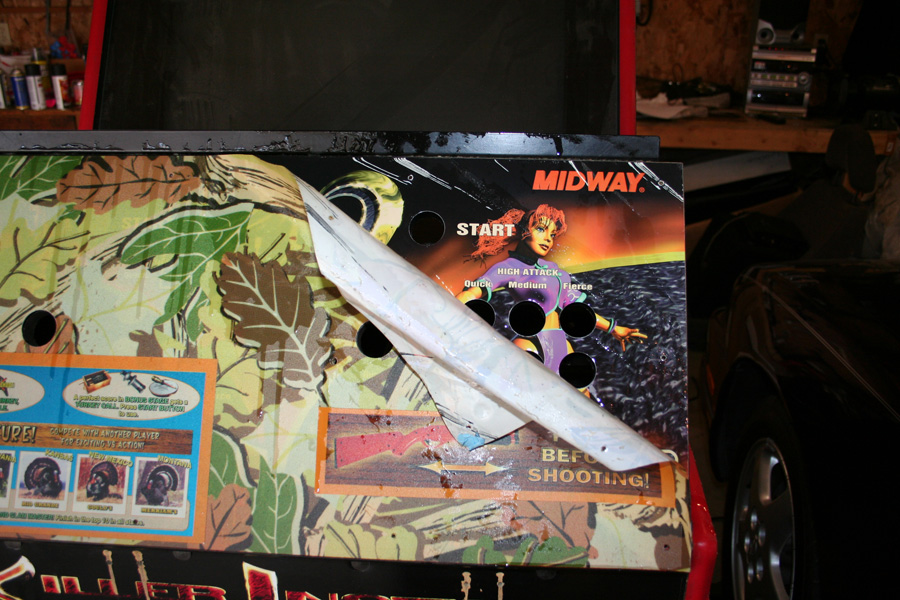
You can see that the new art work pulled up some of the paint from the original art, leaving nasty white lines of missing graphics. Even if that wasn’t the case there were three additional holes drilled in the original overlay around the player 2 joystick and the colors were all faded and dingy (the Killer Instinct logo on the Control panel top is supposed to be red just like the Killer Instinct logo on the control panel front).
I managed to find a new, never used Killer Instinct 2 marquee, which made for the easiest and best looking part of the cabinet “deconversion” so far.

Of course even this took some work, the marquee was for a conversion kit (meaning for people who wanted convert a non Killer Instinct machine to Killer Instinct 2) so it needed to be trimmed to size.
Electronics:
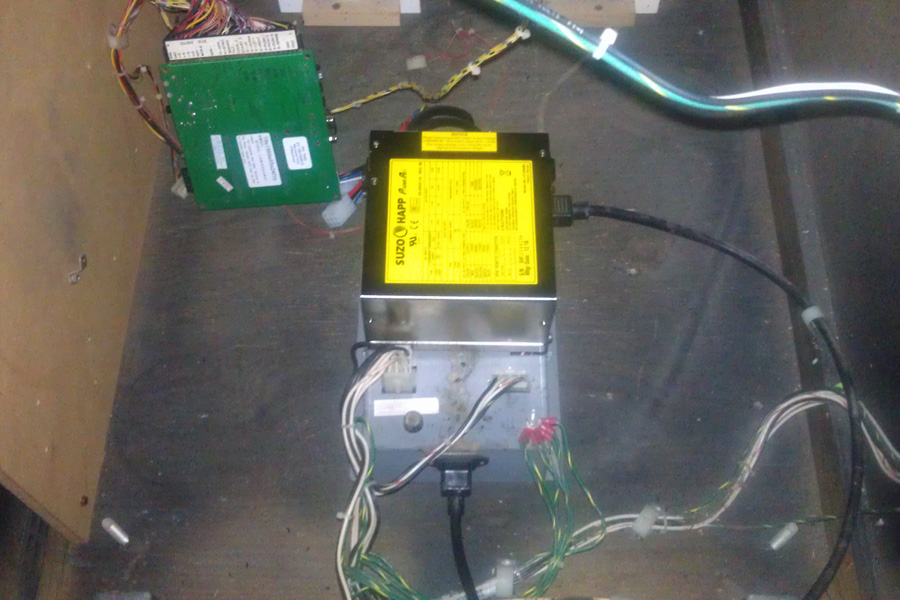
The power supply was making some horrid noises, it wasn’t even the original power supply. I pulled it and bench tested it and found that the output voltages were way off so it was getting junked. The monitor was making some horrible noises too, the PCB I put int to test it wouldn’t boot (due to the bad power supply) so I couldn’t determine if it worked or not.
For some odd reason there were hundreds of finishing nails among other bits of hardware on the floor so I cleaned all of that up to prevent any electrical shorts and I bought a new power supply, then modified it to fit in the original mounting location (the junk one that came with the cabinet wasn’t original and had just been screwed into the floor)
This let me boot it up but sadly the monitor wasn’t showing a clear image
https://www.youtube.com/watch?v=lHxTnAhAsqw
I pulled the monitor chassis and bought all new capacitors and a new flyback, I also planned to replace a few small parts related to image sync to fix the horizontal sync issue the monitor seems to be having. Here is the chassis with all of the new parts installed:

No good, after reinstalling the image quality was better but the monitor couldn’t hold a sync; it was even worse than before. After getting advice from a few experts they told me to check that I hadn’t installed one of the new parts backwards… after pulling the board back out again and checking I found that the part in question wasn’t in backwards but the solder joint wasn’t strong enough, fixing that, and reinstalling the board I get a nice stable picture. Some small adjustments still need to be made but on a whole the picture looks great.
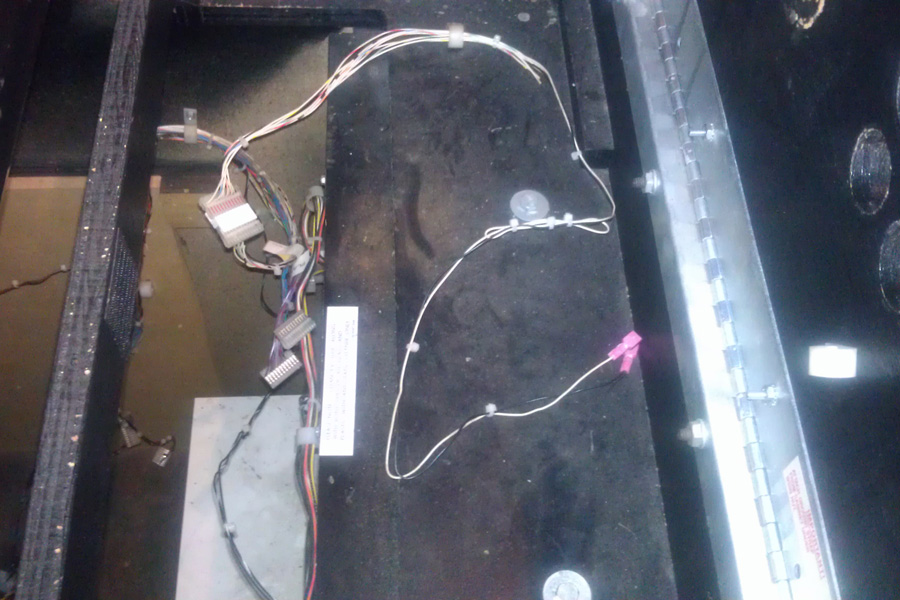
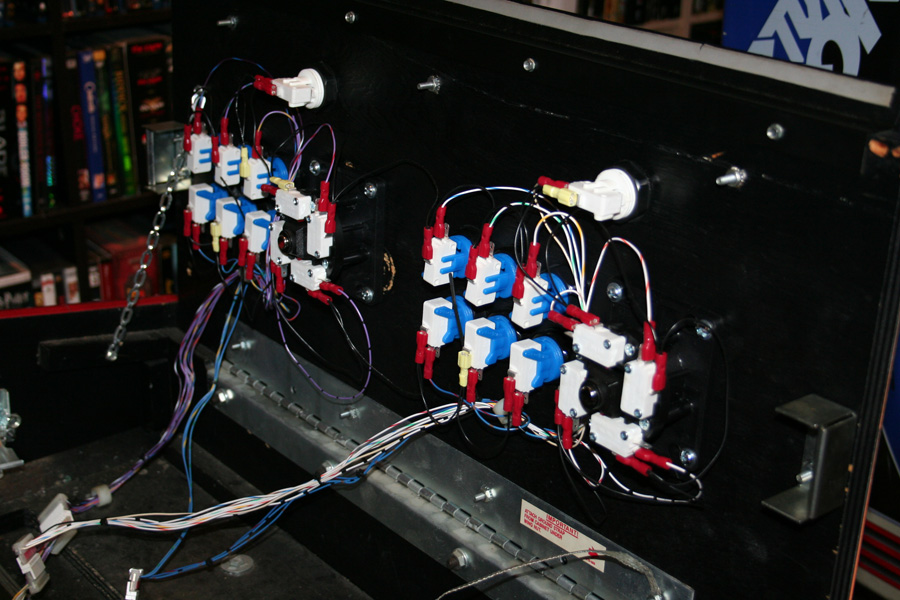
Control Panel:
Not only was the original control panel gutted and then drilled out when it was converted but all of the original control panel wiring had been cut out of the machine as well. I had to completely disassemble the control panel and install new tee-nuts for the joysticks. I bought all new buttons, joysticks and switches. I couldn’t find a Killer Instinct 2 control panel harness for sale so I would have to build one. I found a harness for a different Midway game that used the same style connectors and wiring colors so I bought it. Repinned the connectors for Killer Instinct and then routed, trimmed, and crimped a disconnect onto each wire. Here is what I started with (just 2 wires!), and what I built:
Control Panel Overlay and Monitor Bezel:
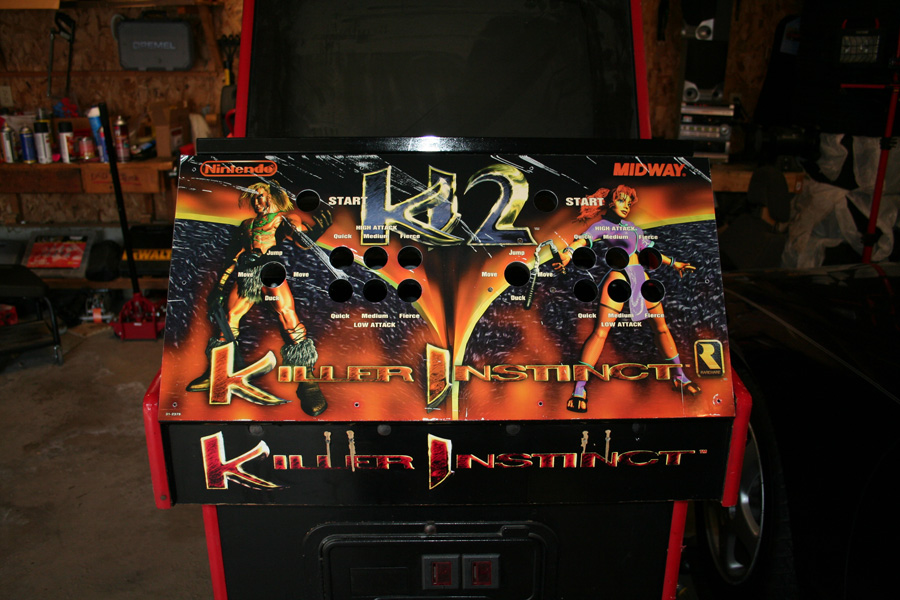
I still haven’t been able to find new control panel art, so I made myself an temporary cover-up out of some black poster board. I also bought a reproduction laser-cut lexan control panel overlay and I had new monitor bezel stickers printed from some scans that I found online.
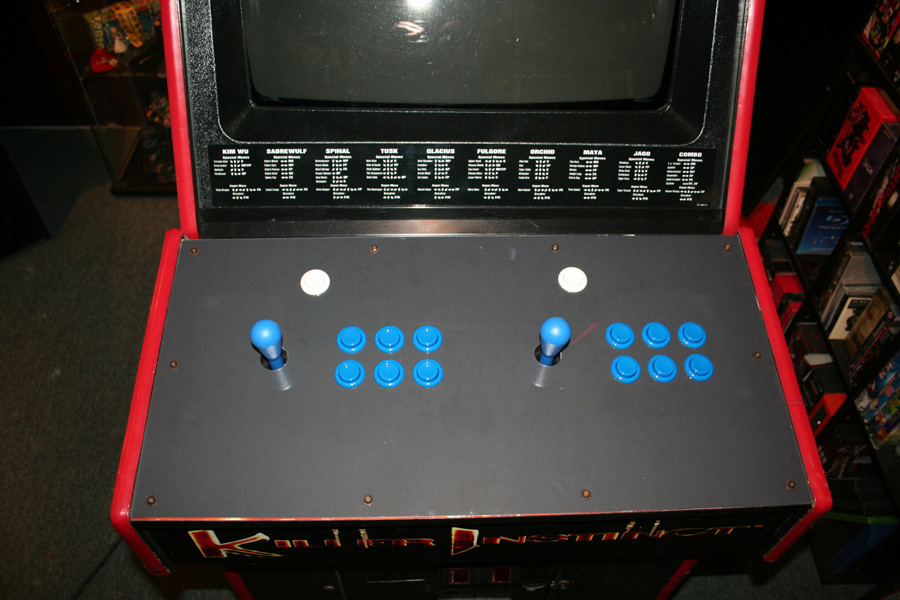
The Results so far:
So I’ve got all of the electronics fixed and rebuilt the cabinet has been washed clean of all the Turkey Hunter conversion stink, the last bit is to plug in the Killer Instinct 2 PCB I bought and fire it up:
I got a few games in and I’m really happy to have all the work so far pay off.
What’s left to do:
I’ve still got some finishing touches to do here is the list
I’ll get some of the larger items on this list done soon, but other items might take a while to source the right parts. I’ll do an in-depth wrap up video once I’m 100% done.
Last weekend I finally got around to fixing the convertible. I got a spare fuel rail from the Fujii boys and replaced the #1 injector.

That’s what I found when I pulled the cap off. The little metal washer had rusted right to the pin on top of the injector. While I was in there I changed the fuel filter and the spark plugs too. The car is now running better than it has since I bought the thing.
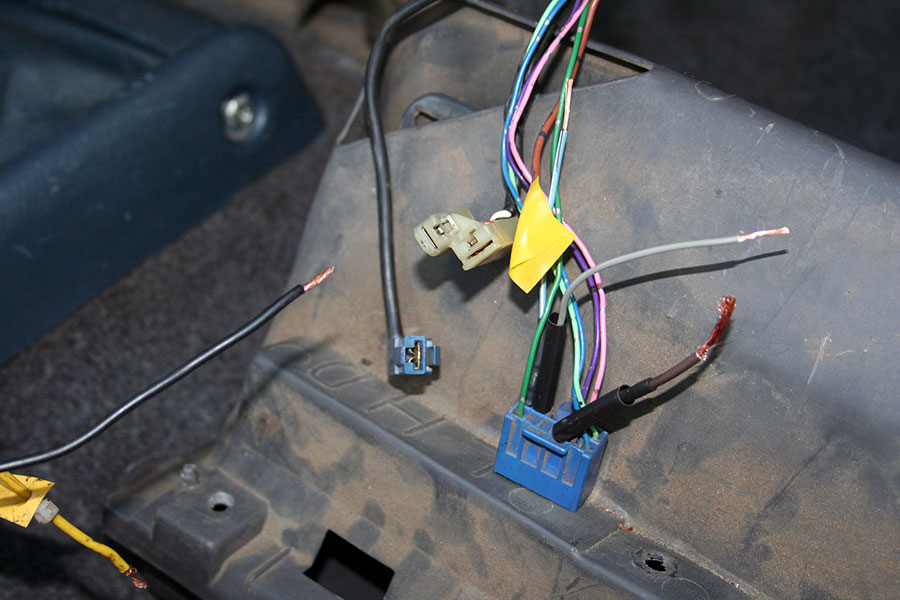
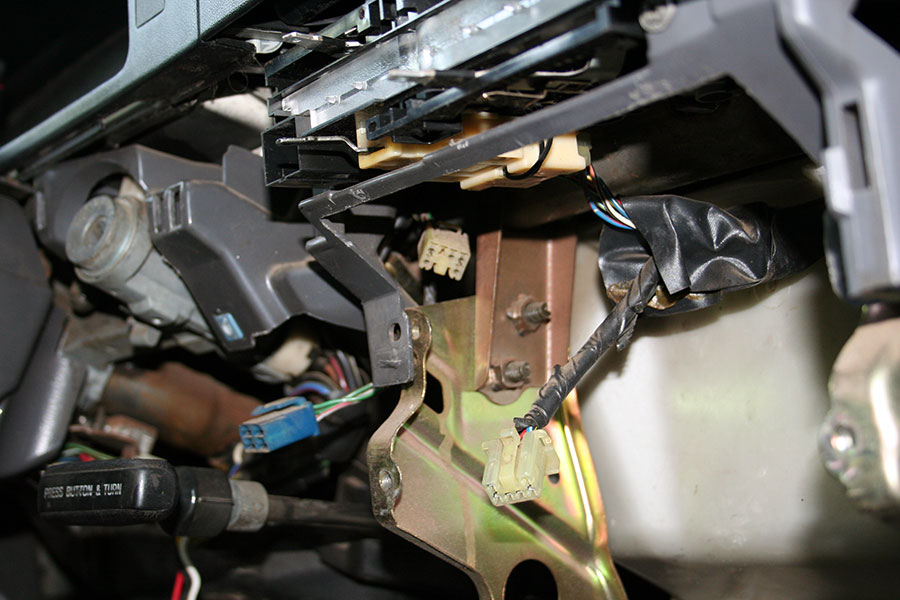
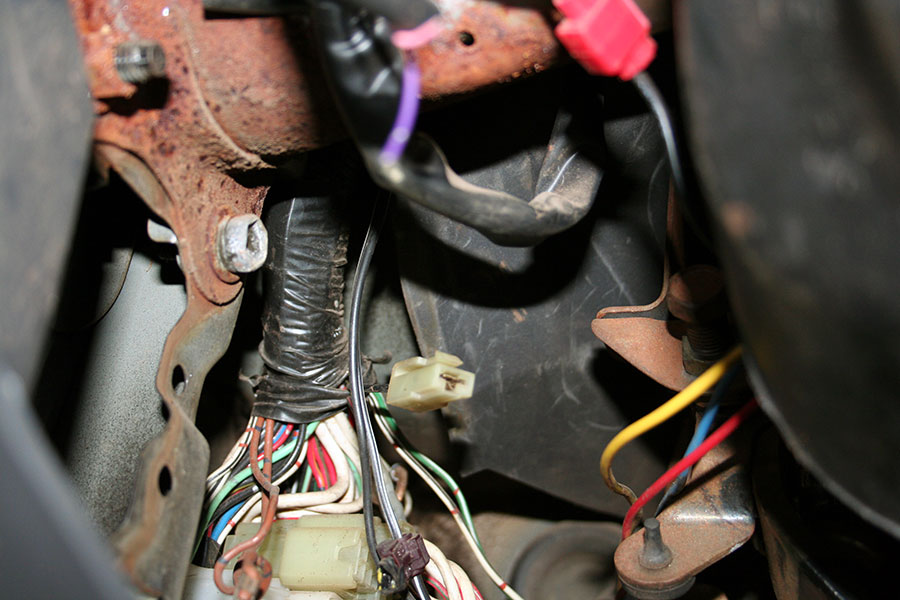
Tore out all the “poorly implemented” wiring in the pickup but I found myself with a number of electrical connectors that weren’t hooked up to anything. The Factory Service manual doesn’t show these… anyone have any guesses? I’ve figured out all the blue connectors, it’s the white ones I don’t know about.
Since I’ve been driving the 240 convertible every day I decided to order some speakers to replace the stock ones. I ordered some 4×6 Alpines for the front and some6.5″ Kenwoods for the rear.
Today I decided to tackle the front speakers, it was way more work taking off the door panels than I had anticipated (mostly due to the convertible seatbelt assembly)
While I had the door panels off I decided to fix the door inserts. a common problem on the convertibles is that this fall off, they’re stapled from the factory, and since you basically pull on these whenever you close the door they don’t hold up. I pulled all the staples and used some really short screws, it held on nice and snug now and I’d suspect it will last quite a bit longer than the staples did.


