Archive for the 'Cars' Category

Subaru Legacy Rear Speaker Adapter

I have a 2nd Gen (1995-1999 BD/BG) Subaru Legacy Wagon and I wanted to installed some 6.5″ Alpine (SPS-610) speakers in all of the doors. It seems although there are many places that sell speaker spacers/adapters for Subarus, no one makes adapters for the rear doors on this generation of Legacy. Apparently most Subarus share identical speaker mounting except for the rear Legacy speakers, they’re a different shape and no one has bothered to make adapters specific for this car.

I recently bought a 3D printer so I decided to make some.

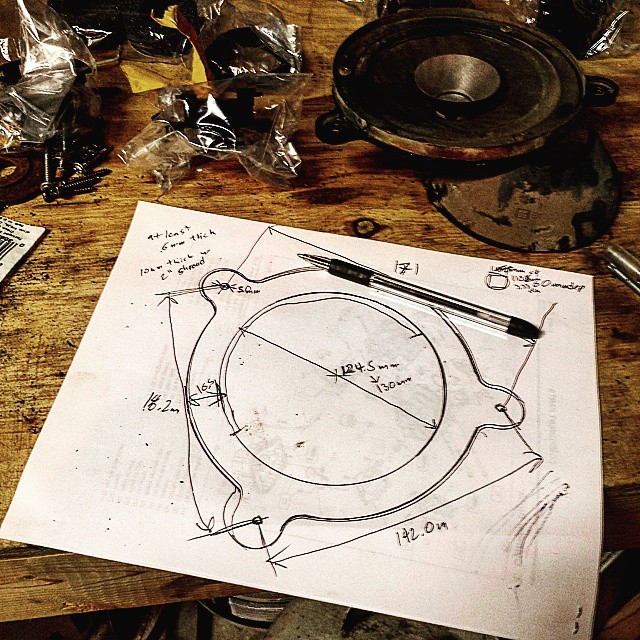
First I took some measurements of the opening in the door, and the spacing between the factory speaker screw mounts. I also measured the depth and basket diameter of my speaker and estimated the depth available in the door with the window down. Finally I estimated the space available between the factory speaker grill and the door itself to make sure I’d have enough room. and I drew up a sketch with some notes.

11377827_1604223863189547_1703726022_n

Next I used FreeCAD to convert my sketch into a digital sketch. I had never used FreeCAD before but I had heard it was similar to SolidWorks (which I am familiar with) so I decided to try it. It’s not nearly as good as SolidWorks but it worked well enough to do what I needed to do.

subaru_legac_rear_speaker_adapter_free_cad

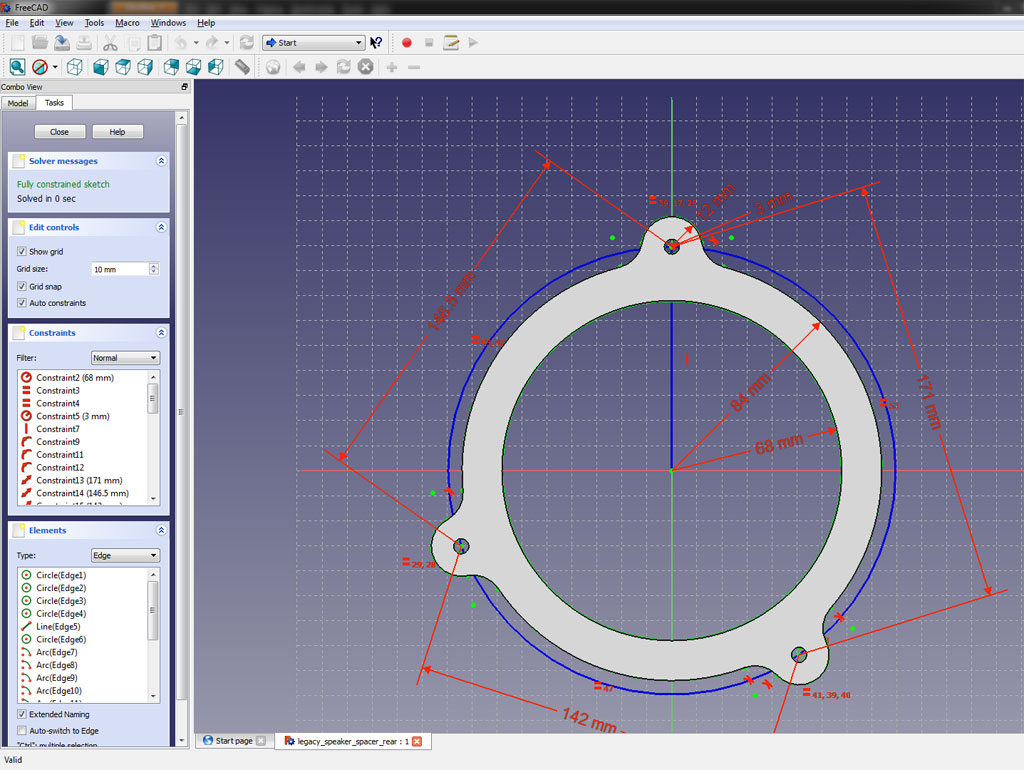
Once the sketch was complete I converted to 3D geometry and exported as an STL file for the 3D print.

subaru_legac_rear_speaker_adapter_free_cad2

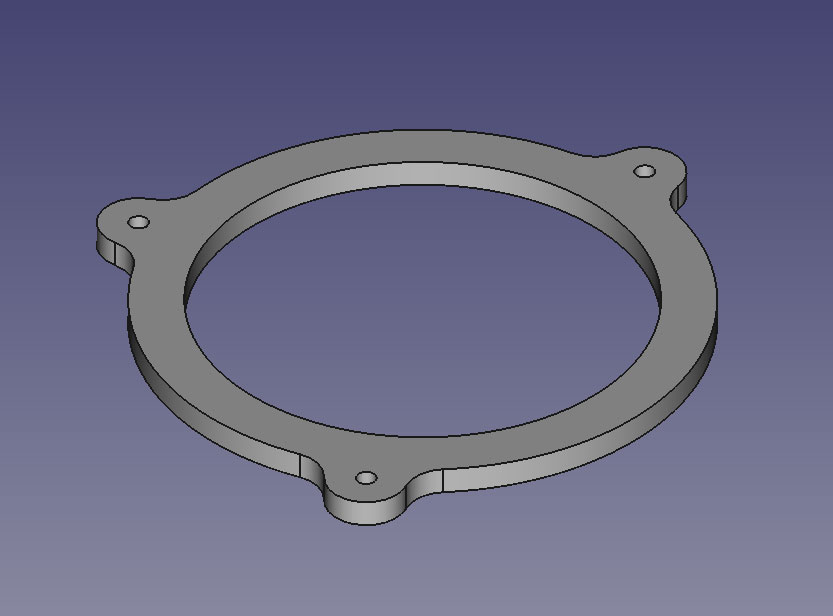
The STL file is then converted to G-Code instructions that the printer can read to create the object.
subaru_legac_rear_speaker_adapter_gcode

subaru_legac_rear_speaker_adapter_print

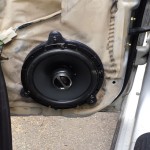
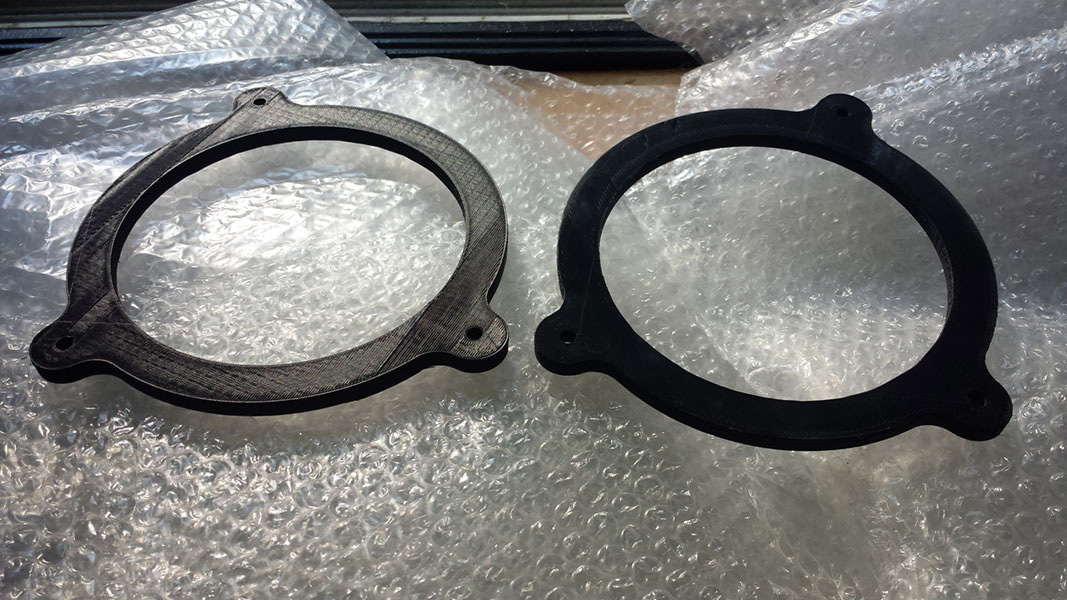
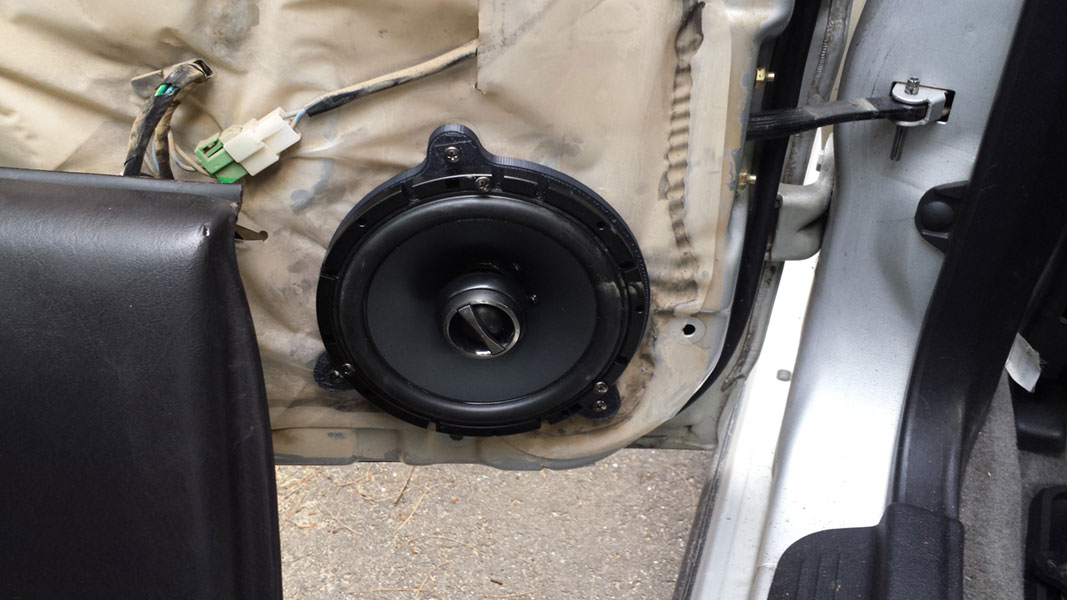
My first version was actually a little too thick, it rubbed up against the back of the speaker grill, So I remeasured, adjusted the 3D model and re-printed… the final result fits flawlessly and mounts up just like the OEM speakers.

speaker_spacers

I used some Metra wire adapters to make the whole thing plug-n-play.

subaru_legac_rear_speaker_adapter_final

If you’re interested in printing your own you can get the files on Thingiverse. I do have some of these pre-printed if you want a pair I will ship them anywhere in the USA for $15.

Perminent Fix for Drooping Mirror in a 2nd Gen Subaru Legacy

I have a 99 Subaru Legacy wagon with a pretty common problem. The rear-view mirror in these cars likes to droop, it adjusts itself downward whenever you go over bumps. It’s a problem that seems to effect all of 2nd generation legacys (1995-1999 aka the BD or BG chassis). It’s mostly due to the design of the mirror, the ball joint is on the back of the mirror rather than the top, which means in order for it to hold it’s position there needs to be a lot of tension in the joint in order to resist the force generated by the weight of the mirror whenever the car hits a bump.

Having owned several 240SXs I noticed that the S14 chassis (1995-1998) uses a very similar size and shape mirror as the 2nd gen Legacy:

legacy_mirror_fix_01

As you can see they both use a similar length arm with a similar shaped mirror and a similar 3-bolt mounting flange. The Legacy mirror is black but the gray color of the 240SX mirror doesn’t matter because it actually matches the gray headliner in the legacy.


What’s not the same about the mirrors the adjustment join:

legacy_mirror_fix_02

As you can see the 240SX mirror has the adjustment joint on the top of the mirror which means that any bumps or vibrations will have little effect on the adjustment. Having owned 3 separate S14s I never had any problems with the mirror falling out of adjustment, nor have I ever heard of it being a problem with other owners.

AMAZINGLY the bolt holes on the mounting flange line up perfectly in the Subaru for a 100% bolt on replacement. I used the plastic cover from the S14 mirror  since the mounting flanges are shaped slightly different but it looks right at home in the Subaru, and no more droopy mirror.
legacy_mirror_fix_03

New 240SX Acquired!

I happened to find a very nice 1997 240SX SE pop up on Craigslist last Thursday after a few calls, and a test drive I put down a deposit on Christmas-eve day and Today I finalized the paperwork and brought it home ahead of the snow storm we’re supposed to get tonight.

1997 240sx SE Starfire Blue

1997 240sx SE Starfire Blue

It has 68K miles and spent it’s entire life with it’s original owner in West Virgina. I bought through Historic Motor Sports in Candia NH, who had it for sale on Consignment. (If you’re looking for a rare or vintage European car I highly recommend them, they have a beautiful showroom and made for one of the best car buying experiences I’ve ever had).

I’ve already started planning the process of moving all of my equipment from the Black car onto this one… stay tuned.

UPDATE: Here are some pictures from the for-sale listing…

I finally finished the custom rear brakes for my pickup

I finally got all the bugs worked out of the custom rear brake setup on my truck. I drove it around for the first time today since the spring. A big thanks to Aaron at Silver Lake Fab for helping me get get past the last few roadblocks.

Custom Toyota Pickup Rear Disc Brakes (from a Mitsubishi Montero Sport) Custom Toyota Pickup Rear BrakCustom Toyota Pickup Rear Disc Brakes (from a Mitsubishi Montero Sport)es (from a Mitsubishi Montero Sport)

Custom Toyota Pickup Rear Disc Brakes (from a Mitsubishi Montero Sport) Custom Toyota Pickup Rear Disc Brakes (from a Mitsubishi Montero Sport)

Rotors, calipers and pads are from the rear of a 2001 Mitsubishi Montero Sport 4×4. The bolt holes on the rotors had to be drilled out slightly (14mm). They seemed to fit initially but they didn’t fully seat.

The brackets are a custom made from my own design. They’re 2-piece, so that the caliper is mounted at the appropriate offset to the rotor. They’re made out of 3/8″ hardened steel.

Custom Toyota Pickup Rear Disc Brakes (from a Mitsubishi Montero Sport)

The soft brake lines are from the front of a Dodge Neon, I’m sure there are lots of other brake lines that could have worked (it’s a standard 10mm fitting) but that’s what my local parts store had in stock. The hard-lines are just pre-flared lines from the local parts store also. They didn’t have the exact sizes I needed so I had to add these j-bends into them to take up the extra length. The soft lines are longer than I would have liked also but they do have these nice little brackets on the ends so I could make up some adapter brackets and bolt them to the axle if I like.

Custom Toyota Pickup Rear Disc Brakes (from a Mitsubishi Montero Sport)

Euro S14 Cluster

I received my S14 Kouki cluster from the UK in today. The European clusters are nice because the gauges have a lot cleaner look to them Instead of E and F on the fuel gauge there is just a red line at empty. The temp gauge is similarly styled. They’re clusters also went up to a higher speed and the UK is of course in MPH which is nice.

S14 UKDM Euro cluster with Aluminum Trim.

I found a set of Aluminum trim rings for the gauges which I think really improves the look of the cluster. These rings are made of polished aluminum. I’m not 100% sold on the shiny look  I’m tempted to go over the rings with some steel wool to give them a brushed look… I’ll see how I like it polished for a while first.

For reference (not my cluster, but exactly like it) this is what my current cluster looks like:

S14 Zenki Cluster

…I’d say the new setup is way more classy.

I also noticed that the Euro cluster has the interior brightness adjustment right on the cluster, this means I’ll be able to remove the button in my dash which is quite nice since I was considering relocating it so that I could use the spot to mount the ambient temp sensor for the Digital Climate Control system.

If you want something done right…

>rear drum brakes had problems.
>rather than replace them I decide to upgrade to disc brakes.
>disc brakes don’t support an e-brake.
>I buy disc brake parts (a couple hundred bucks).
>I buy the disc brake adapter kit (a couple hundred bucks).
>and I buy a transfer case mounted e-brake kit (a couple hundred bucks).
>e-brake kit doesn’t support my transfer case (even though specs said it was compatible).
>decide I’ll have to throw out most of the kit and build custom to make it work.
>remove old drums destroying them in the process.
>calipers and rotors need to be modified to work (this is normal; part of the installation).
>install disc brake adapters and hardware.
>everything seems to be going well.
>surprise, the calipers wont fit under my wheels (even though the specs said they would).
>calipers wont even fit under the larger wheels I have.
>decide this is bullshit so I start taking measurements and doing research.
>buy completely different disc brake parts based on my research (a couple hundred bucks).
>mock up install and wheels have clearance for days.
>take additional measurements and design my own adapter kit.
>my design would be cheaper to manufacture.
>my design will be easier to install.
>my design requires less expensive brake parts.
>my design doesn’t require modification of the brake parts.
>my design is more appropriately proportioned for the truck.
>oh yeah, and my design clears the wheels with room to spare.
>this isn’t the first time I’ve spent over a grand buying specialized parts to save myself time and engineering.
>I sent my LS1 engine mount kit back 4 times before I finally gave up and just modified it to work.
>this time I didn’t even bother trying to send it back.
>apparently I can’t trust people design these things properly.
>if you want something done properly you have to do it yourself.

Dimensionless Caliper Bracket Drawing

New Steering Wheel

Well, not “new” but newly installed. As part of my goal to accomplish at least 1 thing on one of my cars every weekend I finally got around to installing this steering wheel.

S14 Kouki JDM Momo Steering Wheel

This is a steering wheel from a Japanese market “Kouki” Silvia with the Autech Sports Package (Which also included an Autech Spoiler, Autech Grill, Special Badging and  “Silvia” Logo seats). The only one of these I’ve ever seen for sale I bought as soon as I saw it.

This bolts right up and plugs right in but I did need to swap on a JDM clock spring, as it’s significantly different than the US model. I also recently picked up a digital hanging scale so I can compare weights of the various items I swap out on the car. The original Wheel weighed 9.48lbs while the Momo wheel only weighs 7.78bls … 1.7lbs isn’t a huge savings but it’s nice to know that I’m going in the right direction with these changes.

Rake

Rene wasn’t the only one upgrading their suspension today…

Thanks to Rudy I got a new torque wrench and was able to finally install my Nismo suspension. it took longer than expected since I decided to sand and paint all the hardware and mounting brackets with a rust inhibitor. Also I discovered that the brake line bracket on the Silvia is backwards from the 240sx so I had to make a small modification to the brake-line  to make it mount to the bottom of the strut housing.

I only did the front, so I’ve got a nice rake going on… I’m not sure if I’m going to do the rear too or just leave it like this.

I F*CKING HATE MICE…

This is the bird seed and insulation “nests” I pulled out of the headliner and side panels of my car today…

at least I had new seats to put in front and rear.

More Kouki than Zenki

The conversion is nearly complete, I’m waiting for a couple of brackets (which will hopefully arrive by Thursday). then I can install the bumper. The only other thing I’ll need to do is convert the headlight wiring

if you’re wondering, this is what the car used to look like: