I’ve been looking to add more Konami PCBs to my collection it’s one of the few areas I’m lacking and a few weeks ago I saw a Super Contra for sale on eBay, the board looked dirty but ok, and there were pictures of the game running. I didn’t really pay close enough attention and I think I was distracted at the buy it now or best offer price about $100 below what I normally see them listed at. I made an offer for another $25 lower and it was accepted.

above picture from jammarcade.net
Only later did I realize that the ad was tagged as having “Graphics issues”.
Damn, my own fault for not paying attention, hopefully it’s not an irreplaceable custom. The game plays fine and audio is fine but it does indeed have graphics issues…
Check for Obvious Damage
OK, so first thing is first, lets just see if there is any obvious physical damage. the Super Contra PCB is a 2-Board set with the main board on top and an equally sized ROM expansion board attached below for the graphics and audio ROMs. I notice that one of the Resistor Arrays on the expansion board is badly damaged, that seems to be the only obvious problem I can find beyond the board being pretty dusty.
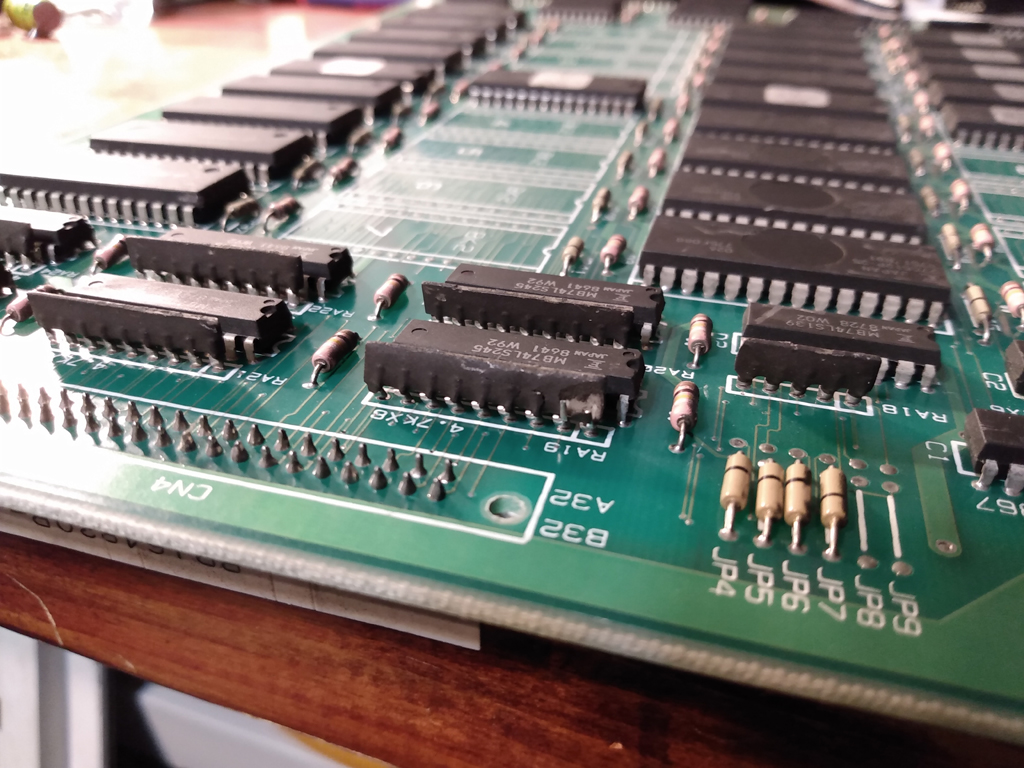
So I replace that and check again… no change 🙁
Normally at this point I’d do simple check like dump the ROMs and verify their content against MAME unfortunately there 36 ROMs on this expansion board and all of them are soldered in place! I decide to look up if there is a dip switch for test mode and hope that there is a ROM check.
There is! and the results are…
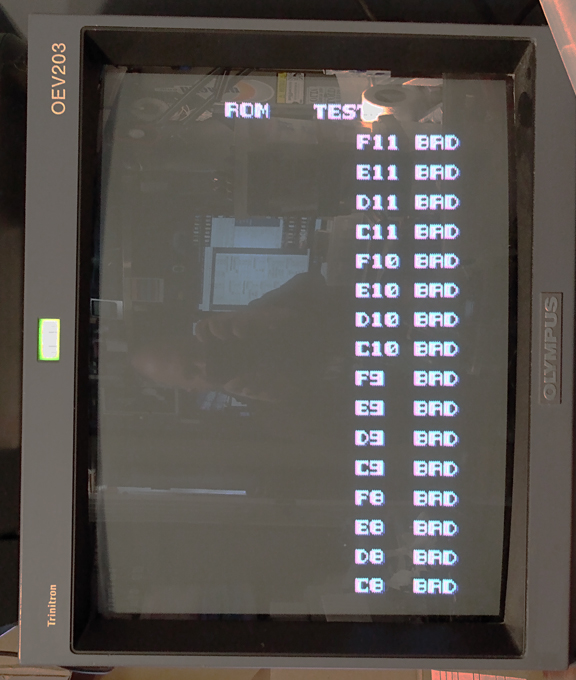
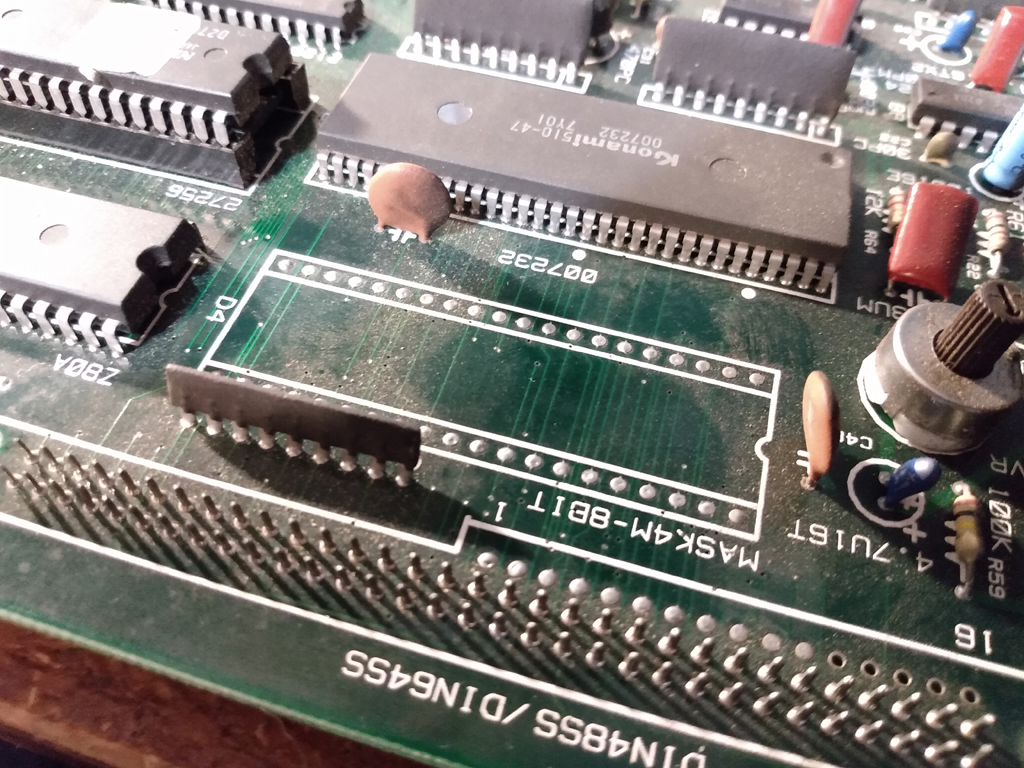
So apparently half the ROMs on the expansion board are “BAD”; doubtful. Most likely there is more than one resistor network that needs replace or maybe a bad logic IC. I start looking over the board again for clues when I notice that each of the 3 expansion board connectors on the main board also has some large, unpopulated, ROM sockets.
Quick Maths
Looking at the MAME driver I see that the 5 unpopulated 4mbit sockets are exactly the same size as all 36 chips on the expansion board.
ROM_START( scontra )
ROM_REGION( 0x20000, "maincpu", 0 ) /* banked program ROMs */
ROM_LOAD( "775-e02.k11", 0x00000, 0x10000, ... ) /* banked + fixed ROM */
ROM_LOAD( "775-e03.k13", 0x10000, 0x10000, ... ) /* banked ROM */
ROM_REGION( 0x10000, "audiocpu", 0 ) /* 64k for the SOUND CPU */
ROM_LOAD( "775-c01.bin", 0x00000, 0x08000, ... )
ROM_REGION( 0x100000, "k052109", 0 ) /* tiles */
ROM_LOAD32_BYTE( "775-a07a.bin", 0x00000, 0x20000, ... )
ROM_LOAD32_BYTE( "775-a07e.bin", 0x00001, 0x20000, ... )
ROM_LOAD32_BYTE( "775-a08a.bin", 0x00002, 0x20000, ... )
ROM_LOAD32_BYTE( "775-a08e.bin", 0x00003, 0x20000, ... )
ROM_LOAD32_BYTE( "775-f07c.bin", 0x80000, 0x10000, ... )
ROM_LOAD32_BYTE( "775-f07g.bin", 0x80001, 0x10000, ... )
ROM_LOAD32_BYTE( "775-f08c.bin", 0x80002, 0x10000, ... )
ROM_LOAD32_BYTE( "775-f08g.bin", 0x80003, 0x10000, ... )
ROM_LOAD32_BYTE( "775-f07d.bin", 0xc0000, 0x10000, ... )
ROM_LOAD32_BYTE( "775-f07h.bin", 0xc0001, 0x10000, ... )
ROM_LOAD32_BYTE( "775-f08d.bin", 0xc0002, 0x10000, ... )
ROM_LOAD32_BYTE( "775-f08h.bin", 0xc0003, 0x10000, ... )
ROM_REGION( 0x100000, "k051960", 0 ) /* sprites */
ROM_LOAD32_BYTE( "775-a05a.bin", 0x00000, 0x10000, ... )
ROM_LOAD32_BYTE( "775-a05e.bin", 0x00001, 0x10000, ... )
ROM_LOAD32_BYTE( "775-a06a.bin", 0x00002, 0x10000, ... )
ROM_LOAD32_BYTE( "775-a06e.bin", 0x00003, 0x10000, ... )
ROM_LOAD32_BYTE( "775-a05b.bin", 0x40000, 0x10000, ... )
ROM_LOAD32_BYTE( "775-a05f.bin", 0x40001, 0x10000, ... )
ROM_LOAD32_BYTE( "775-a06b.bin", 0x40002, 0x10000, ... )
ROM_LOAD32_BYTE( "775-a06f.bin", 0x40003, 0x10000, ... )
ROM_LOAD32_BYTE( "775-f05c.bin", 0x80000, 0x10000, ... )
ROM_LOAD32_BYTE( "775-f05g.bin", 0x80001, 0x10000, ... )
ROM_LOAD32_BYTE( "775-f06c.bin", 0x80002, 0x10000, ... )
ROM_LOAD32_BYTE( "775-f06g.bin", 0x80003, 0x10000, ... )
ROM_LOAD32_BYTE( "775-f05d.bin", 0xc0000, 0x10000, ... )
ROM_LOAD32_BYTE( "775-f05h.bin", 0xc0001, 0x10000, ... )
ROM_LOAD32_BYTE( "775-f06d.bin", 0xc0002, 0x10000, ... )
ROM_LOAD32_BYTE( "775-f06h.bin", 0xc0003, 0x10000, ... )
ROM_REGION( 0x80000, "k007232", 0 ) /* k007232 data */
ROM_LOAD( "775-a04a.bin", 0x00000, 0x10000, ... )
ROM_LOAD( "775-a04b.bin", 0x10000, 0x10000, ... )
ROM_LOAD( "775-a04c.bin", 0x20000, 0x10000, ... )
ROM_LOAD( "775-a04d.bin", 0x30000, 0x10000, ... )
ROM_LOAD( "775-f04e.bin", 0x40000, 0x10000, ... )
ROM_LOAD( "775-f04f.bin", 0x50000, 0x10000, ... )
ROM_LOAD( "775-f04g.bin", 0x60000, 0x10000, ... )
ROM_LOAD( "775-f04h.bin", 0x70000, 0x10000, ... )
ROM_REGION( 0x0100, "proms", 0 )
ROM_LOAD( "775a09.b19", 0x0000, 0x0100, ... ) /* priority encoder (not used) */
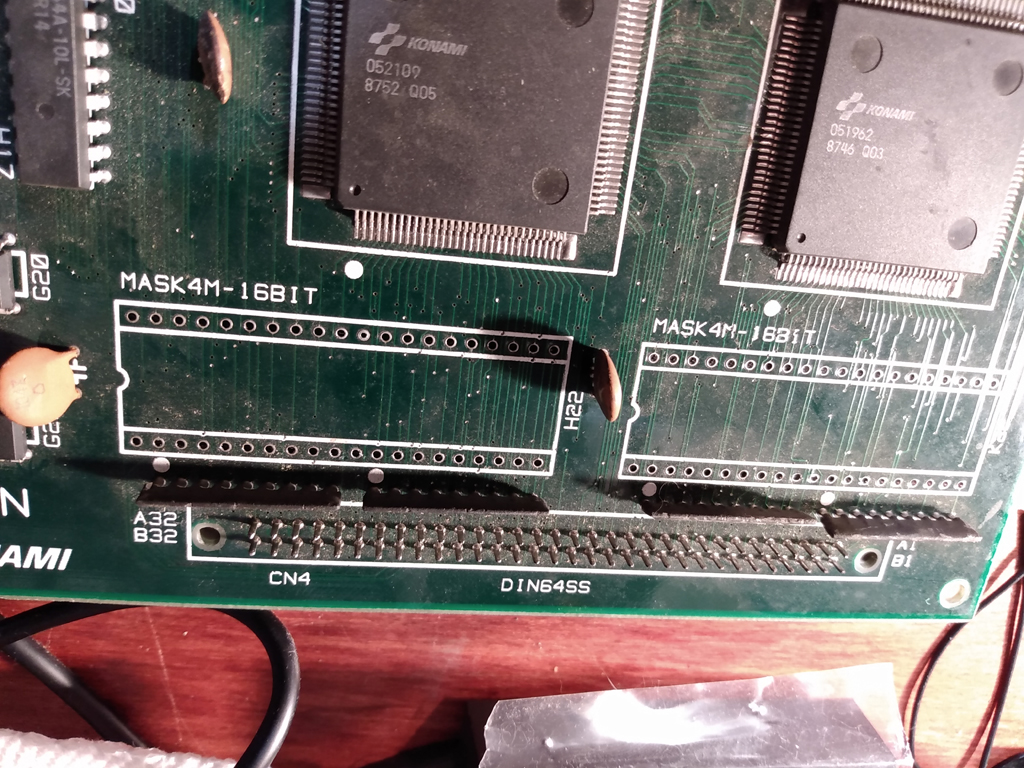
ROM_ENDLooking at this I see that the section labeled “k007232” is 4mbit in size, and is 8-bit data and between the k007232 IC and one of the expansion board connectors there just so happens to be an empty 8-bit 4mbit EPROM location (see photo above). Similarly, the sprite (k051960) and title (k052109) data happen to have 8mbit of 32-bit data each. and each one of those chips has 2 16-bit 4mbit unpopulated location between the chips and an expansion board connector (see photos below).
It looks to me like the expansion board can be completely eliminated by installing some sockets in these locations, and then merging the data from the 36 ROMs into just 5 4mbit ROMs. The idea if being able to shrink the PCB stack to half it’s current size AND potentially fix my PCB in the process seems like a lot more fun than trying to work out what component on the expansion board is bad So I start de-soldering the unpopulated locations in preparation for sockets.
There are at least 2 different common pin configurations for 4mbit DIP40 EPROMs. There is the JEDEC format which is used by 27c4096 and 27c4002, however this format is 16-bit only so that’s not likely it since it’s not going to work for our 8-bit k007232 audio ROM. The other is an “MROM” format used by 27c400 and 27c4100. You can find the differing pinouts here, and as you can see from the pinouts the easiest way to tell them apart is the Vcc Pin. checking to see which pin is tied to +5V makes it super easy to identify which type of chip is expected here. After verifying, as anticipated, they all use the MROM format. Luckily I recently restocked my 27c400s so I have plenty on hand.
Merging the Data
Since the k007232 audio ROM is 8bit merging the data from MAME is very easy, simply concatenate it all together and you’re done. Doing this in a batch file with the following windows command is simple:
type 775-a04a.bin 775-a04b.bin 775-a04c.bin 775-a04d.bin 775-f04e.bin 775-f04f.bin 775-f04g.bin 775-f04h.bin > 04.d4The other 4 files will be a bit more complicated. The resulting data needs to be 32-bit and currently it’s stored on 8bit-roms, which means that sets of 4-roms at a time are acting like a single 32-bit ROM. the new sockets are for 16-bit chips, which means that every other set of ROM data needs to be interleaved before those sets can be concatenated.
If you’re not familiar with interleaving I usually describe it like this: Imagine you have 2 stacks of paper and together they form a single document. now if the document was simply cut in half then you can make it whole again by “concatenating”; in-effect just sticking one stack of paper on top of the other one. However if the data was split such that you could read 2 pages at once (so odd-numbered pages in one stack and even numbered pages in the other); then if you wanted to combine into a single stack you’d need to “interleave” them. Meaning, you’d take one page from the first stack, then one page from the second stack, then one page from the first stack, then one page from the second stack, and so on.
Doing this with a ROM file can be more complicated than a single command line. There are tools out there that can do this such as the wonderful BINman. BINman is great but it uses a GUI and I’ve needed to do this enough that I really wanted a command line took for doing these kinds of things. When modifying files in MAME you often need to interleave and de-interleave the same files in the same way, over and over and over again. So being able to make a batch-file script to do that greatly simplifies the process.
I built a tool to do this called (un-creatively) ts_rom_tool (aka twistedsympony’s ROM Tool). Please try it out if you think you’ll find it useful and let me know what you think. You’ll need python installed on your machine but then it’s just a matter of placing the script in the folder with your ROM files and then you can perform command line operations for interleaving, byte swapping, splitting and a bunch of other things. Using this I built the following script to generate the necessary ROM files for my Super Contra Consolidation.
md out
REM k052109 tiles
python ts_rom_tool.py -interleave 775-a07a.bin 775-a07e.bin 07a.bin
python ts_rom_tool.py -interleave 775-f07c.bin 775-f07g.bin 07b.bin
python ts_rom_tool.py -interleave 775-f07d.bin 775-f07h.bin 07c.bin
type 07a.bin 07b.bin 07c.bin > out/07.h22
del 07a.bin
del 07b.bin
del 07c.bin

python ts_rom_tool.py -interleave 775-a08a.bin 775-a08e.bin 08a.bin
python ts_rom_tool.py -interleave 775-f08c.bin 775-f08g.bin 08b.bin
python ts_rom_tool.py -interleave 775-f08d.bin 775-f08h.bin 08c.bin
type 08a.bin 08b.bin 08c.bin > out/08.k22
del 08a.bin
del 08b.bin
del 08c.bin


REM k051960 sprites
python ts_rom_tool.py -interleave 775-a05a.bin 775-a05e.bin 05a.bin
python ts_rom_tool.py -interleave 775-a05b.bin 775-a05f.bin 05b.bin
python ts_rom_tool.py -interleave 775-f05c.bin 775-f05g.bin 05c.bin
python ts_rom_tool.py -interleave 775-f05d.bin 775-f05h.bin 05d.bin
type 05a.bin 05b.bin 05c.bin 05d.bin > out/05.h4
del 05a.bin
del 05b.bin
del 05c.bin
del 05d.bin

python ts_rom_tool.py -interleave 775-a06a.bin 775-a06e.bin 06a.bin
python ts_rom_tool.py -interleave 775-a06b.bin 775-a06f.bin 06b.bin
python ts_rom_tool.py -interleave 775-f06c.bin 775-f06g.bin 06c.bin
python ts_rom_tool.py -interleave 775-f06d.bin 775-f06h.bin 06d.bin
type 06a.bin 06b.bin 06c.bin 06d.bin > out/06.k4
del 06a.bin
del 06b.bin
del 06c.bin
del 06d.bin

REM k007232 data
type 775-a04a.bin 775-a04b.bin 775-a04c.bin 775-a04d.bin 775-f04e.bin 775-f04f.bin 775-f04g.bin 775-f04h.bin > out/04.d4

pause
The Results
I could have traced out address lines and logic pinouts to help determine which ROM goes where but I decided I was too lazy for that and based on the naming convention for the ROMs on the expansion board I made some educated guesses as to which new EPROM should go where. With the expansion board removed and the new EPROMs installed I was pleasantly surprised when I booted into test mode and was greeted with this:
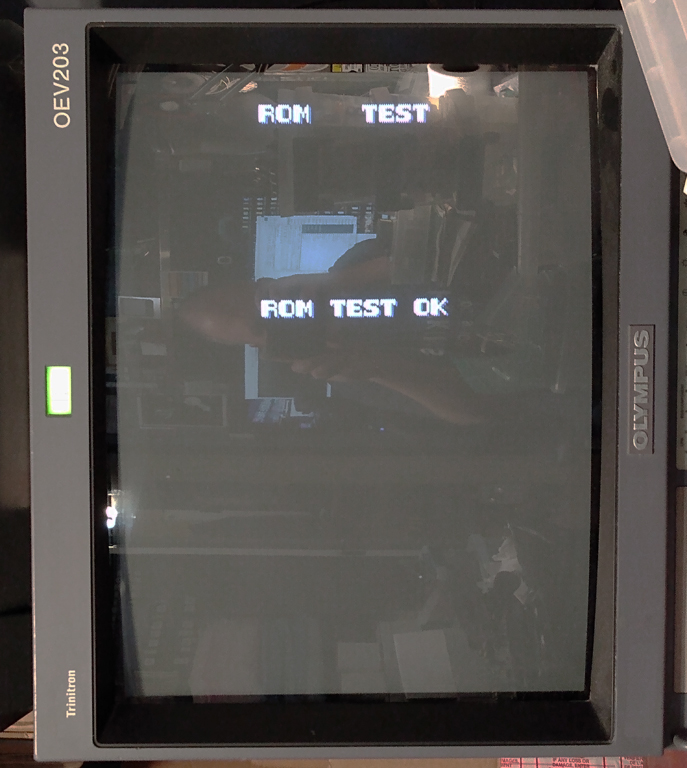
No BAD ROMs! my guess work was correct (the ROM locations are all specified in my creation script above if you’re interested). Powered Down and booted up into game mode on a cab for the moment of truth…
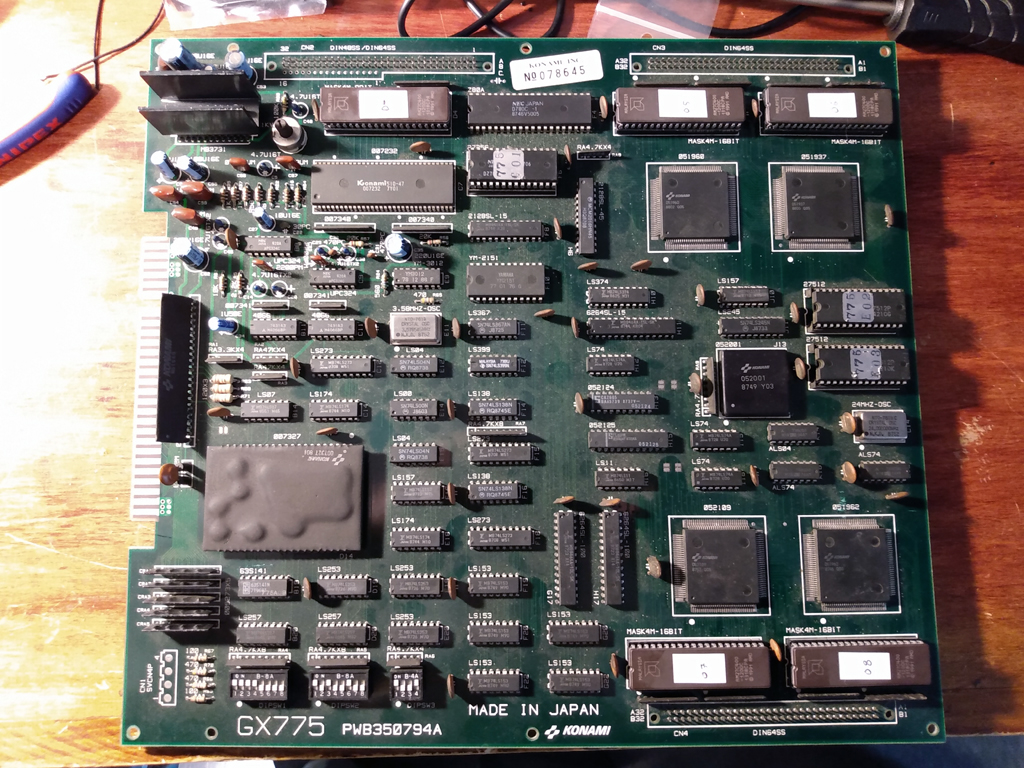
The game is now fully working, graphics errors are completely gone and my PCB is nice and compact now too. here is what the final board looks like:
All in all I’m quite happy with how this turned out, had I not bought a board with graphics issues I might not have ever thought to try this consolidation.
0 Responses to “Super Contra Repair and Single Board Conversion”